December 09, 2011

Paci-Pops

A mini-post about a mini-popsicle...


My daughter LOVES popsicles. Obviously letting a one-year old hold her own popsicle would result in a huge, sticky mess, so we created paci-pops yesterday. Put equal amounts of juice and water in a small container (I used the lid of baby bottle, worked perfectly), just enough to complete cover the nipple of a pacifier. If you haven't guessed by the last statement, place pacifier, nipple down, into the juice/water. Freeze and serve.


Still a little messy, but what isn't messy with a one-year old?!


December 04, 2011

Best Snow Day Recipe Ever {Seriously!}

Several years ago, while living in another neighborhood, we received three snowstorms, back-to-back.  The result was no work, no school, limited cable and lots of boredom! Prior to the snowstorm, I stocked up on the ingredients needed for White Chicken Chili {and Bloody Mary's, but that is a whole 'nother story}.  This delicious cheesy chili was all it took to win the hearts of my neighbors. In some cases, it created friends for life. So next time the weather channel predicts record amounts of snow (or just a tiny cold front), pick up these items and invite some neighbors over for a cup! TRUST ME, it will be a big hit {they will beg you for the recipe...but don't give it away - ha ha}.

White Chicken Chili
3 cups chicken breasts, cooked and chopped
2 cans great Northern beans, drained
2 cans cream of mushroom soup
1 can of Rotel tomatoes (pick your spice level - I go Medium)
1 can chicken broth
2 cans shoepeg corn, drained
1 (16-oz) pkg Velveeta cheese, cubed (the Mexican version works well too)
1 large onion, chopped
1/4 tsp pepper
1/4 tsp ground cumin

Saute onion in butter until tender. Combine all ingredients and place in slow cooker for 4-6 hours. Serve with Mexican corn bread. 

Yummy, yummy, yummy its so good in your tummy.....


August 08, 2011

Cherry Chip Cookie Sandwiches

Do people actually like crunchy cookies?  I mean, I'll eat one in a pinch.  Maybe even two or three....just not to offend whoever was offering them to me. But, personally, for me, soft cookies are the ONLY cookies.  

Last week I came across Cherry Chip cake mix and decided to bake SOFT Cherry Chip Cookie Sandwiches. They turned out pretty darn good -- and I don't even like cherry flavoring. 

Cherry Chip Cookie Sandwiches 

1 box of Cherry Chip Cake Mix
2 eggs
1 Tbl water
1/3 cup of vegetable oil

Mix together and bake 8-10 minutes at 350 degrees. Makes approximately 3 dozen.


For the cookie sandwich filling, I used Betty Crocker's Cookie Creme (I don't care what Martha says, there is NOTHING wrong with semi-homemade). The cookie creme tasted a lot like Oatmeal pie filling.... 


Easy. Yummy. Pretty.

July 09, 2011

DIY Paper Bowl

I don't know about you, but I always have a crap load of shredded paper each month. And it is ALL from freaking junk mail! Its a little insane if you ask me. Can I just stop receiving junk mail? Can I sign up for some kind of "do-not-call" junk mail registry? Please tell me!!! 


Anyway, at least I can use some of it for crafting purposes...


DIY Paper Bowl 


Tools
Glue
Water
Brush
Shredded Paper
Plastic Wrap
Glass Bowl

Step One
Gather your shredded paper. I simply used my existing shredded junk mail. But, you could use pretty paper and use the bowl as decoration or as a gift "basket", etc.


Step Two
Mix together school glue and water. Less glue than water. You are going for a milky texture.


Step Three
Wrap your mold (i.e. glass bowl) with plastic wrap.


Step Four
Glue on the shredded paper. Have fun. Get messy. 


Step Five
Allow paper to dry overnight (or for 20 minutes in Colorado sun).


Step Six
Remove from bowl and plastic wrap. This picture is a bit deceiving. The bowl actually does have some depth to it.


Using this technique, you could create all kind-of fun things from your shredded paper! Maybe use a baby food container, a balloon, or a box for a fun mold!


June 21, 2011

2011 Summer “Bucket” List


Every year I feel like summer is over before it even begins, but this year, I vow to take the time to enjoy all things summer. Here is my 2011 Summer “Bucket” List:

Eat outdoors as often as possible – enjoy the warm evenings!

Make oodles of s’mores {LOVE these ideas

Make homemade Butter Pecan ice cream {YUM – found the recipe in one of those old church cookbooks, hoping it works out so I can share!} 

Create a small garden & successful grow something OTHER than weeds

Take long evening walks with the family {Mr. Beaux suggested this one}

I know he looks rather lazy, but TRUST me, he'd rather be on a walk. 

Can something…preferably something I grow myself

Make lots of trips to the mountains – for a day trip or a camping trip {I only live an hour away, what is my excuse?!}

Buy produce from the local farmer’s market

Go fishing!

Take lots and lots and LOTS of pictures of Sweet Pea enjoying her 
first summer!

Sweet Pea's first time at the park!

June 13, 2011

Pop Art Candleholders

I LOVE candles!  To me, everything is improved by candlelight. In fact, I would love to light my house with just candlelight to hide the fact I have NO TIME to actually clean these days. Sigh.  Although, I must have some free time since I am creating crafts and blogging…but of course, that is different, right??????

But, like I said, I love candles. Therefore, when my friend’s birthday planning rolled around and we established a Fiesta theme, I JUMPED on the opportunity to create a simple craft that was decorative, inexpensive, embraced the Fiesta theme and contained a candle element.

I call them “Pop Art Candleholders” and I created two main styles.

 "Holes" and "Curly"

Curly Style

Step 1:  
Obviously wash and spray paint your pop can. If you need a picture explaining this step-by-step, please stop reading by blog… I cannot help you.

Step 2: 
Ok, first of all, I apologize for the statement in Step 1, my 6 month old is teething and keeping me up at all hours of the night.  Now, moving on to step 2, cut off the top of your pop can. I used an Exacto knife, but any sharp tool will work.


Step 3
Cut pieces down the side of the pop can. Make sure you cut them within an inch or two from the bottom of your can. This will give you more curl.  Also, be sure to trim off your sharp edges after your cut the sections {much easier than trying to even everything out in step 2}.


Step 4
Using a pencil, curl the sections. Don’t do all the curls in uniform, random or alternating looks better.


Holes Style

Step 1: 
See step 1 above.

Step 2: 
Poke holes in your pop can. I used this handy tool the Hubs had in the garage, but a nail or a good old hole punch would work. In fact, I would have LOVED to use a star hole punch for this project, but I don't own one. Funny enough, I don’t own a single solitary hole punch. Can you tell I am NOT a scrap-booker?? Although I hope to become one...someday...


Step 3: 
Cut off the top of your pop can. See Step 2 in the above tutorial.

Step 4: 
Cut sections down the side of the pop can. These sections should be short and fat and the same length all around. Clean up any super sharp edges. 

Also, don't worry about your pop can getting a little bent... it just adds more character!


Step 5: 
Make a small fold down each section. We want to make certain those sharp edges are folded away.


Step 6: 
Make another fold.


Step 7: 
Fan out the sections as desired.


June 10, 2011

Watermelon Mango Salsa

When my step-mom told me about this recipe, I had two instant thoughts “ew, gross” and “I absolutely have to try that!”…I realize these two thoughts generally do not go together, but what can I say, I’m just weird that way!

I didn’t have the official recipe, so I searched online and found TONS and TONS of recipes very close to what I wanted to create.  In the end, I just played around with the core ingredients and kept it basic {my favorite kind of recipe}. The result was TOTALLY YUM I LOVE the flavor that the jalapeño and cilantro give the watermelon and mango. You seriously have to try this!!!!!


Watermelon Mango Salsa (4 servings)
1 cup watermelon, diced
2 mangos, diced
1 jalapeño, minced
1 fresh lime
1 tsp sea salt
2 Tbs fresh cilantro, minced

Combine the diced watermelon, mangos, jalapeño, sea salt and cilantro into a large bowl. Gently toss to mix ingredients. Squeeze the fresh lime juice over the mixture and refrigerate at least 30 minutes before serving. Serve over grilled chicken (or fish), with a side of yellow rice and black beans.

June 06, 2011

Chocolate Covered Strawberry Cupcakes

My mom's birthday was Saturday and to celebrate, I baked her Grandma Bessie's strawberry cake... with a slight, dark chocolate, twist. USUALLY {okay, most of the time}, my experiments turn out very, very badly. Lets just say I've had to clean burnt cake out of my oven many times.... However, this experiment turned out deeeelicious! And, in my opinion, the chocolate was EXACTLY what this recipe was missing.  

Great-Grandma Bessie's Chocolate Covered Strawberry Cupcakes

Note: I made cupcakes because the ganache scared me... I didn't want to ruin yet another cake!


Step One: Make the cupcakes

Great-Grandma Bessie's Strawberry Cake Recipe {The Original}
1 Box White Cake Mix - I use Duncan Hines
1 Package of Strawberry Jello
1/2 Cup Vegetable Oil
1/2 Cup Water
4 Eggs
1/2 Box/Bag Frozen Strawberries

Combine cake mix and jello. Add cooking oil and water. Beat together. Add eggs. Beat. Fold in strawberries. Makes two 8 rounds or 24 cupcakes. Bake as directed on the cake mix box. 


Step Two: Add ganache (i.e. chocolate!)

Ganache
For the chocolate, I wanted to use a dark chocolate ganache. I researched lots of recipes and they were pretty much all the same, however, here is the one I used. Worked perfectly! Fool proof. Seriously.

Once my ganache had been mixed and slightly cooled, I dipped my cooled cupcake in the mixture.  It looked something like this:


Dipping

Dripping

Step Three: Let ganache cool to set and then add frosting

Strawberry Frosting
My great-grandma Bessie had a recipe for frosting too, however, since I am a novice baker {at the best}, I could NOT decipher what she meant by "2/3 stick butter". Does she mean 2/3 cup?  Well, I tried that... and it didn't work.  

Moving on to plan B...the Hubs rushed off to the store to purchase a can of strawberry frosting for me to "doctor".....I did so blending 1/2 cup of frozen pureed strawberries and 1/2 cup of powdered sugar to the canned frosting. Add more powdered sugar if frosting is too runny.

Step Four: Top with a chocolate covered strawberry, chill prior to serving!

June 03, 2011

Placemat Folder

The slogan for this posting is simple - I am not a seamstress. Not even remotely close. I point this out to you for one reason and one reason only -- my lack of sewing skills should prove just how darn easy this project was to complete.

Placemat Folder Tutorial

Tools/Supplies

Placemat, Ruler, Sewing Machine (thread, etc) and iron

Step One:

Find a placemat. Any fabric, rectangle placemat will work. I got mine for $1.75 at Kohl's. I think it is rather pretty, don't you?


Step Two:

Create the bottom fold (i.e. pocket) of the folder. From the bottom of the placemat, measure up 3 inches and mark.


Step Three:

Fold the bottom of the placemat up (using markings previous made) and iron to create a nice crease.  


Step Four:

Time for the sewing machine {ew}! To create the bottom pocket of the folder, sew each end shut.


Step Five:

Create the "cover" of the folder. Start with the "front" (i.e. left side) of the placemat and measure in 6 inches and fold. Remember to iron!


Step Six

Create the "back cover" of the folder. Using the "back" (i.e. right side), measure 6 inches and fold. Again, iron, iron, IRON!


Step Seven:  


Technically, step seven should show you a picture of the sewing machine again. But, since I am not a seamstress, I got so flustered with sewing that I forgot to take a picture {oops}.


The goal here is to divide the folder into three pockets. Using the folds you created in step 5 and 6 as a guide, sew the section of the placemat I am showing between my fingers. Repeat for the left side of the folder.


Finally, the end result!!!! Cute, huh? I left mine plain, but you could fancy yours up with a button, ribbon or embroidery.


I think I'm going to use my folder to hold my grocery list {cause I'm the type of girl who likes to cross things off her list} and my coupons. As I buy an item, the coupon will move from the left side of the notebook, to the right. This will prevent me from crumpling the coupons as I use them and shoving them into my pocket. Which then, I either forget about by time I check-out {t-r-a-g-i-c} or I spend a good 5 minutes smoothing them out for the cashier, who never seems too thrilled with me since crumpling them makes them harder to scan. Sigh...


How else could I use my folder? I could use it to sort my notecards.


Or, I could use it to organize my bills {puke}.


This project took me approximately 15 minutes to complete.  And......wait for it......I AM NOT A SEAMSTRESS!!! 

June 01, 2011

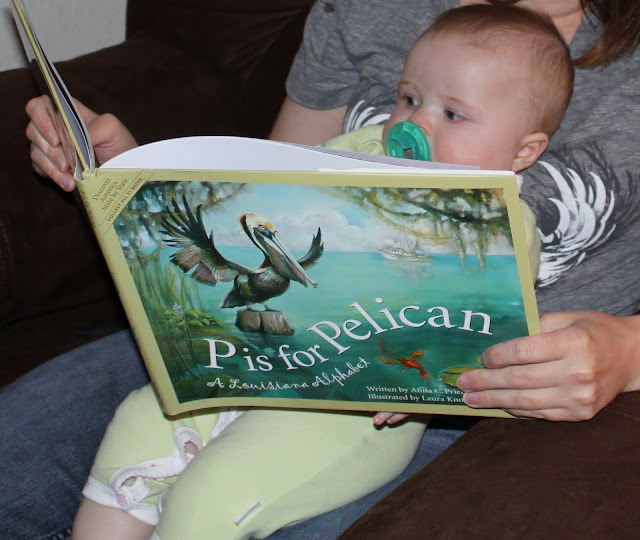
P is for Pelican

Have you heard of the state alphabet books by Sleeping Bear Press?  They’re kind-of awesome… and Sweetpea would agree.


They are colorful, fun and informative. Every state has a book, but Louisiana is my favorite {hmmm…wonder why?}.


Sample Pages

Cover of book

G is for the Gulf of Mexico.

 M is for Mardi Gras {well, duh}.

May 30, 2011

Nora's Nursery - DIY Custom Mural


I LOVE my daughter's nursery. It turned out exactly as I had planned {which never, ever, ever happens in my life}. It is warm and cozy, shabby chic and a little tropical {think, Bob Marley's Three Little Birds}. Just perfect!

I used Waverly's Small Talk Blackbird Fabric for the base of the nursery design. The design contains birds, leaves and trees and the core colors in the fabric were black, white, gold and grey. Not too girly, kind-of tropical... perfect for my style.

DIY Custom Mural {for non-artistic people like myself}

Step One: Locate Design

I knew I wanted a mural on the wall, but drawing is not a skill I possess. So, I faked it. Using the fabric as a guide, I found a tree design I liked on the web, printed it and traced it onto a clear sheet protecter. 

Step Two: Trace on Wall

On a borrowed overhead projector, I traced the tree outline onto the wall. A laptop and LCD projector would have worked even better because you could skip the whole "trace it onto a clear sheet" part!

Step Three: Create Templates for Small Details

Once I had the tree drawn, I created templates of the leaves, birds and flowers. I simply placed freezer paper over the fabric and traced the items. Then, I traced the template onto a heavier card stock. I randomly placed the templates on the tree and traced them onto the wall. I made some mistakes...okay...lots of mistakes. Thankfully, pencils come with erasers.

Step Four: Paint

Once everything was drawn, paint your mural {don't be scared, it's just paint}. For this mural, I used acrylic paint in white, black and gold. I mixed the white and black to get my grey. I bought 4 ounce bottles of each color and had plenty left over! 

I found it much easier to get the tree and branches painted first, then the leaves, then the birds.  


Step Five: Admire

Step back and admire the mural!  


Because I was 7 months pregnant and still suffering from "morning sickness", this project took me about six weeks.  However, it could EASILY be completed in a weekend by a non-puking person.